BEELEY ART PORTRAITS 2020
PORTRAITS - ONE
PLOTTING THE FEATURES
PRODUCING A REALISTIC PORTRAIT
1/ Starting the portrait
There are many ways of drawing to produce a realistic image, no one correct or incorrect way. There have been many rules to use as an aid which appeal to some artists and not others.
As a learner or improver as we all are we can select what works for us if we know what there is to choose from.
Accurate drawing is not about the ability to put pencil to paper.
Accurate reproduction of any subject is about being able to see what is actually there and not what the brain thinks should be there.
From a young age we are taught to see the world in inaccurate ways.
We show our children how to draw a person with a round head, lollipop trees, the door in the middle of the house. And we are convinced every scene has a camera perspective. All this and much more has to be ‘unlearned ‘ in order to see accurately and then draw what we see.
Over the next few weeks I will show you exercises to practice.
I will commence very simply and build on what you have practiced each lesson.
Eventually we will have learned not only how to draw the portrait, but how to apply what we have learned to all subjects and media.
Attend, practice and Good luck.
Judith
I have included a number of photographs of faces looking directly at the camera.
Because we are using photos we will be drawing as the camera sees
i.e. – from one perspective. The focus, and perspective, diminution, clarity etc. is all from one point.
Portraits after 1415 – the invention of the camera obscura to the emergence of the impressionists used this perspective and then the popularity of the photo brought it back.
Remember it is only one of many ways of portraying a face.
I have attached a number of photos for you to use, but please look for your own.
Look for a symmetrical face looking directly at you.
But first read through what you would be doing if you drew this example.
My example

On a piece of paper a similar size as your portrait so you don’t have to constantly think of changing g the size at this stage., set you paper under or at the side the photograph. Use a soft pencil to draw lightly.
A/
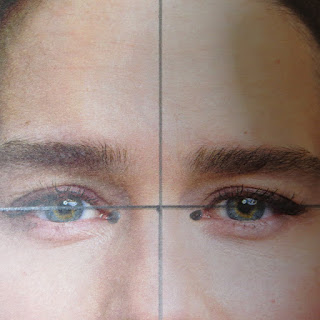
Draw a line connecting across the pupils and extending across the whole picture
(Many books say this is half way up the head, but every face is different )
The eyes are the soul of the face and the most important to draw.
What ever else is produced the yes must be accurate. Even if they are only a black shadow in the dark they are just as important to give mood, and accuracy.
You now need to choose your reference measurement. You will use this to measure everything else you draw.
I often use the distance between the corners of the inner eyes. This is small enough to be repeated and large enough to use as a divide, which especially is useful to enlarge of diminish.
I have used black spots to show you. But you can use any thing you feel is useful.
B/
Draw a line at right angles (it maybe almost vertical) half way between the pupils.
This should be seen to travel down the nose.
This line give you the other reference you need. No face is symmetrical but most are not far off and for those which are asymmetrical this is very useful as your reference. By looking at this face now you can see immediately that the right side of her face is shorter and smaller than the left, which makes everything to draw slightly higher or lower than the left. Her mouth is tilted, her right eye is ever so slightly smaller. Her right eyebrow is sloping and her lid more hooded. These discrepancies when noted and drawn will give her personality and character. When missed will make her look too perfect and not quite her.
C/
Now start by marking lightly the corners of the eyes. Your first decision is to decide how much lower they are. You can decide that now because you can use your chosen measurement indicator. i.e. the measurement between the two dots you drew between her eyes. I reckon the depth from the horizontal line to the eye corner is about 6/6 of the length of the indicator line between the corners of the eye. So I know how much lower to mark the paper for the actual corner of the eye.
The next task is to plot a mark to show the other corner of the eye. I reckon the outer corners are the same length as the indicator line – between the eye corners. So plot those and you now have the eyes marked accurately. Did you note the end of the left eye is slightly nearer the horizontal eye line you drew?
D/
The depth of these eyes can be plotted the same way.
Look vertically from the pupil, up and down and you will see in this portrait that the lower lid at that point is the same level as the corner of the eye and the upper lid is the same distance again. See photo.
E/
You can now use the vertical central line in the same way to plot with marks where the nose lies and nostrils.
I reckon the lowest bit of the nose is vertically just less than 1 and a half times the length of the horizontal indicator line. The nostrils are a quarter.
For the widest part of the nose, look vertically down and you can note it is slightly wider that the two dots you have plotted for the indicator line.
F/ how much lower is the mouth? Using the vertical line you can plot the top of the upper lid, base of upper lid, the tiny space between, then the lower lid.
You can mark how much lower the chin will come.
Check your accuracy by looking at how it compares with other features. I would check that the distance from the bottom of the nose to the open lower part of the upper lip is the same as from the open lip to the chin. The distance from the crossed lines between the eyes and the lower nose end is the same as from the upper lip to the chin.
G/ Continue to plot and then draw when you have checked your plotted marks until you have completed the basic face. Check sideways and then diagonally.
Continually stop to check, and correct. It is upsetting to draw for ages then find it is in the wrong place. Don’t finish any part until you have checked. – vertically , horizontally and diagonally.
E/
This all seems laborious but with practice it becomes automatic and the measuring is done with one look, so don’t despair. It will all come with practice.
Examples of face on portraits.


LESSON 2
You now have the basics for looking and plotting what you see.
Try this method on at least 3 photos, ensuring they are all straight on poses looking directly at you.
Shading is not necessary as this exercise is about precision plotting
Shade if you wish but we will cover shading/ tone later.
LESSON 3
Now we turn to the self portrait.
Every artist worth their salt, has practiced on themselves.
This is not due to vanity. The main reason - is when you think about it -
is that you have a constant subject available which can move, and change just as you wish.
We start this conversion with a face on photo of yourself.
So when you have taken or found a photo of yourself, practice just what you have been practicing on the previous pictures, but on your own familiar face.
Don't be distracted by thinking things like
I'm not that lob sided,
I thought my eyes were equal.
Gosh I've got so many lines
Just draw what you see in the photo.
I guarantee it'll be worse when you draw with a mirror!!
LESSON 4
Make yourself presentable so you can see your own face straight on and prepare a chair in front of the mirror where you can sit comfortably.
Support your pad of drawing paper as vertically as possible. You will prevent any distortion this way.
Have a water soluble felt pen or chalk to draw on the mirror glass.
Now look at your self in an analytical way the same as you did with the photos.
Don't smile because you can't hold that expression for long enough. Try to look relaxed because the tendency is to look sterner and more serious as time progresses.
Spend some time just looking and asking yourself the questions you need to know,
Go through the process in your mind before you stat drawing.
Decide where the eye line is, the distances between your features. Where are your ears? How long is your nose?
What shape is your mouth? Does it go up or down at the corners, How much further down your face is your chin?
How large or small are your mouth, eyes, eyebrows, nose and nostrils and other features when you compare them with each other.
Now start to draw yourself as you did the photo.
Keep checking plotting points as you did previously.
If you get stuck use the felt pen.chalk to draw on the mirror which will give you exact distances and shapes to copy.
Just concentrate on drawing the features and don't bother shading unless you wish to.
Good luck
SOME STUDENT RESULTS.
Aren't they a great start?

Elizabeth Harrison
Diane MacBain
By Linda Fussy
LESSON 3/
A/
Now we are going to repeat the process but with a portrait set at an angle.
Most faces are not seen straight face on.
An artist never actually chooses to produce one in the position we have been trying out as it is devoid of character and depth, or at least much more difficult to achieve.
So choose a photo set at an angle.
Here are some examples
 3
3
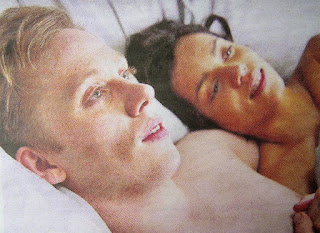
1 – The head is slightly tilted down and he is looking at an angle away from the camera.
Look to see where the mid line will go vertically between the eyes mid mouth and chin.
It will have to curve around the ball of the scull a little and be on one side of the head. A line through the eyes will curve down on the left
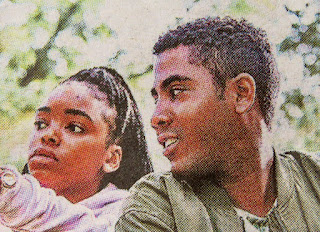
2 – The mid line will be on a slant to the upper left and slightly to the left of the face compared to the drawings we have done so far.
3- This mid line will slant the opposite way. The jaw is wide open distorting the face. If you imagine his mouth closed you can see the whole head is slanted upwards and the eyes are much higher up.
These may help you to visualise the lines you need.
 Chin tilted much more but more face on, but still not symmetrical
 To one side with a downward tilt

From above. You are seeing much less of the face and more of the top of the head
These two show the upper tilt. Can you work out where the lines should go?
One is a development from the other.
B/
This is a quite straight forward, slight tilt and placement to one side.
 This side profile with a tilt has the central line going down from the top of the forehead, bridge of the nose, upper lip to chin, and notice the eye line is an a tilt
 The central line is much more tilted in both these, so are the eye lines, and amount of face seen when comparing the sides of each face.
 The girl has the upper tilt, with the lips, nose and forehead on a similar diagonal line and the chin and bridge of the nose on a parallel line. The ear is on a line from the eye, but at right angles to the central line .
The male is almost in profile but you catch just a hint of the other side of his face. As his face is tilted up, his eye line is tilted down and away to the left.
C/
Now its time to drawn your own.
D/
When you are ready try to quickly draw another person, concentrating only on the lines positions and basic features.
Try to repeat this on as many people as you can.
The more you do the more you will see without thinking about it.
2007
I am presently running the U3A art afternoon, at Beeley village Hall, second Thursday each month.2 till 4pmAll levels welcome.
Student work samples.
after one lesson in portraiture.
Work below from one student when I taught for the Open College of Art correspondence courses


I am running the U3A art group monthly at Beeley Village Hall, 2pm till 4pm for anyone who is interested in painting and drawing.
ReplyDeleteEveryone 50 plus welcome. Condition to join the U3A.
Next meeting 2pm when we will be studying tree formation.
ReplyDelete